October 28, 2021
Arthrocentesis
Robert M. Bramante, MD, FACEP
Cameron W. Harrison, MD
I. Introduction and Indications
- Many disease processes can be accurately diagnosed and treated appropriately by aspiration of fluid from joint effusions.
- Especially true of septic arthritis, a true medical emergency.
- Aspiration of joint fluid can sometimes be a difficult task, especially if only a small joint effusion is present.
- Ultrasound guidance can be very useful in locating joint fluid for aspiration and testing.
- Ultrasound can differentiate between joint effusion and other pathology as well.
- Based on physical examination it may be difficult to distinguish between joint effusion, cellulitis, abscess, or bursitis.
- Ultrasound can reduce procedural pain in knee arthrocentesis.1 It can improve novice provider procedure confidence and decrease procedure time.2
- Use of ultrasound imaging enables real time procedural guidance to ideally increase success rate and decrease complication rate of joint fluid aspiration.
II. Anatomy
Ankle
- Usually it is best to access ankle effusions through the tibiotalar joint space.
- You will need to assess the tibialis anterior tendon which can be visualized just lateral to the medial malleolus.
- This tendon can be visualized best while holding resistance to the dorsum of the foot and asking the patient to dorsiflex their ankle.3
- Another important landmark is the dorsalis pedis artery.
- It courses in front of the ankle joint and lies in between the extensor hallucis longus on its medial side and the extensor digitorum longus on its lateral side.
- It is important to avoid this artery during attempted aspiration.
- The extensor hallucis longus tendon runs from the medial side of the fibula to the end of 1st distal phalange (toe).3
- It can sometimes be better visualized by dorsiflexing the toe.
- The dorsalis pedis artery lies lateral to this tendon and should be avoided during aspiration.
Knee
- The anatomy of ultrasound guided knee arthrocentesis involves the quadriceps femoris tendon which will be attached to the patella distally and the quadriceps muscle more proximally.
- You should also be able to identify the femur which will usually lie directly under the quadriceps muscle and the quadriceps tendon.1,4
- In-between the femur and quadriceps femoris tendon is an important fat pad, which is flanked by the patella more distally.
- This area is called the suprapatellar space and will be the location in which you will attempt to aspirate fluid.
Hip
- The femoral neck and head appear hyperechoic with posterior shadowing.
- The psoas muscle can be seen superficially.
- Effusion is contained between the hyperechoic bone and the dense hyperechoic capsule.5
- The femoral vessels are medial and should be identified prior to arthrocentesis.
Shoulder
- The humeral head appears hyperechoic laterally.6
- It articulates with the glenoid fossa and contains infraspinatus tendon superficially.
Elbow
- On the lateral aspect of the elbow, key structures are the capitellum at the lateral epicondyle and its articulation with the radial head distally.
- The common extensor tendon can appear superficially.
- An effusion appears hypo/anechoic within this joint space.7
III. Scanning Technique
Ankle
- Anteromedial to the tibialis anterior tendon
- Linear transducer
- Transducer notch cephalad (Fig. 1)
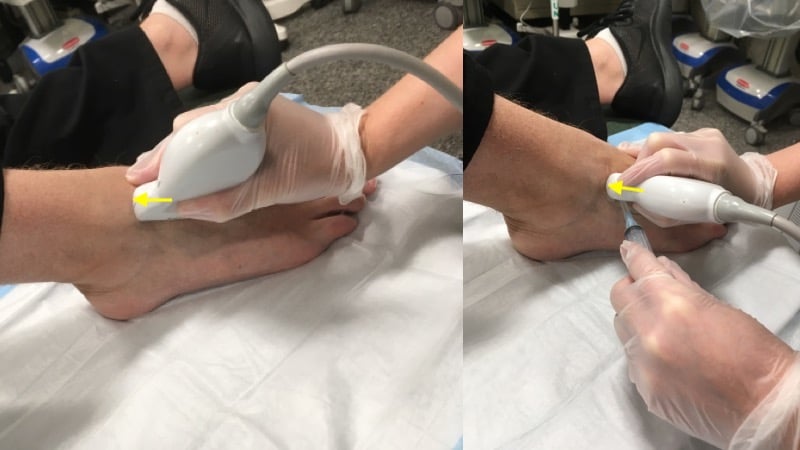
- Figure 1. Transducer placement for ankle arthrocentesis
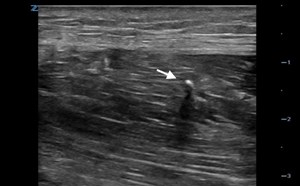
- Identify the hyperechoic tibial cortex and scan distally to the joint space and identify the next shadowing hypoechoic structure, the talus. Fluid should appear anechoic in the tibio- talar space. (Fig. 2a,b)
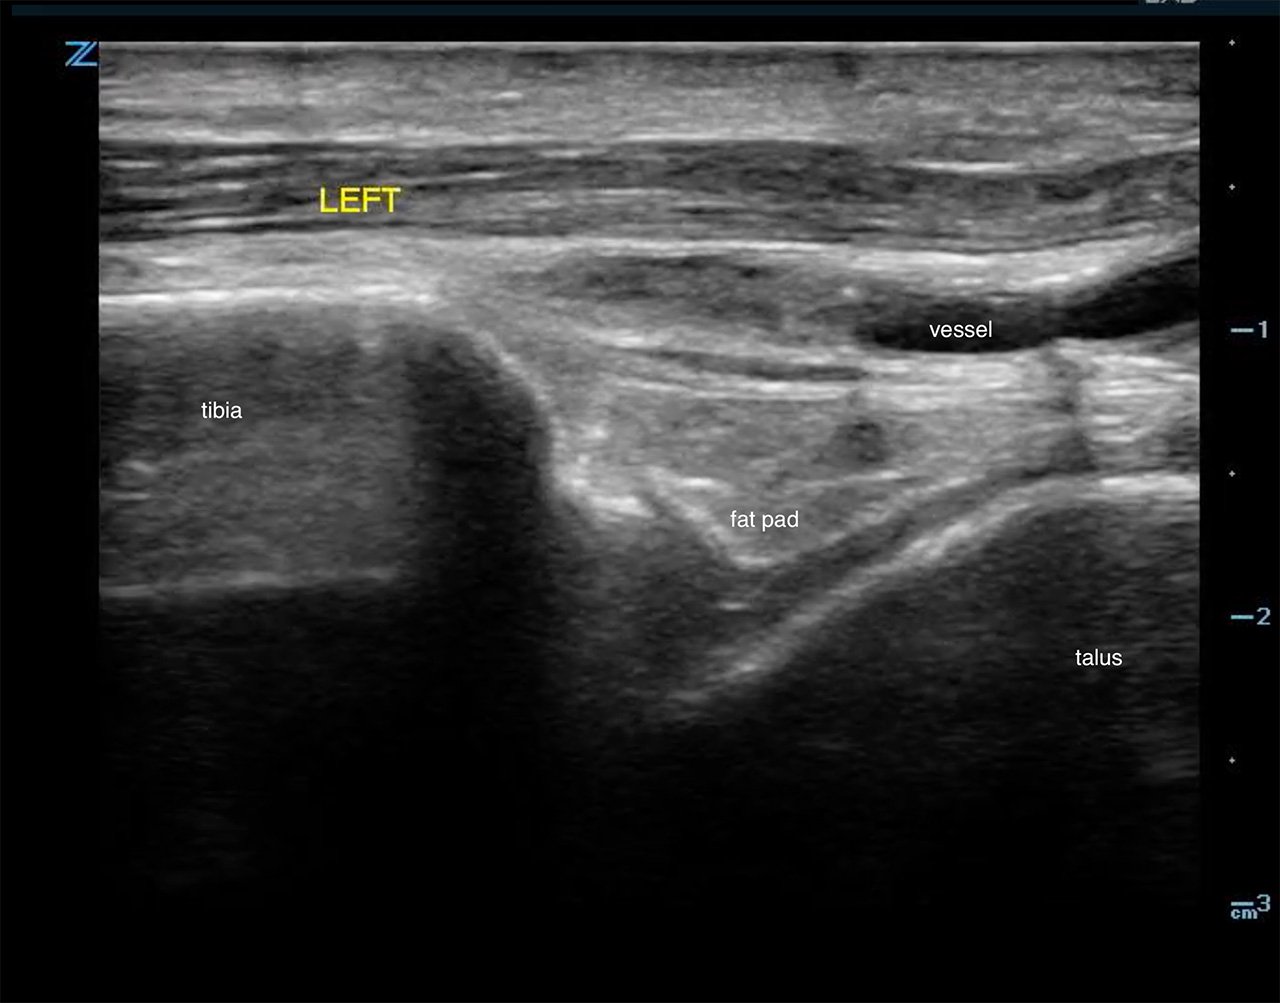
- Figure 2a. Ultrasound demonstrating normal ankle
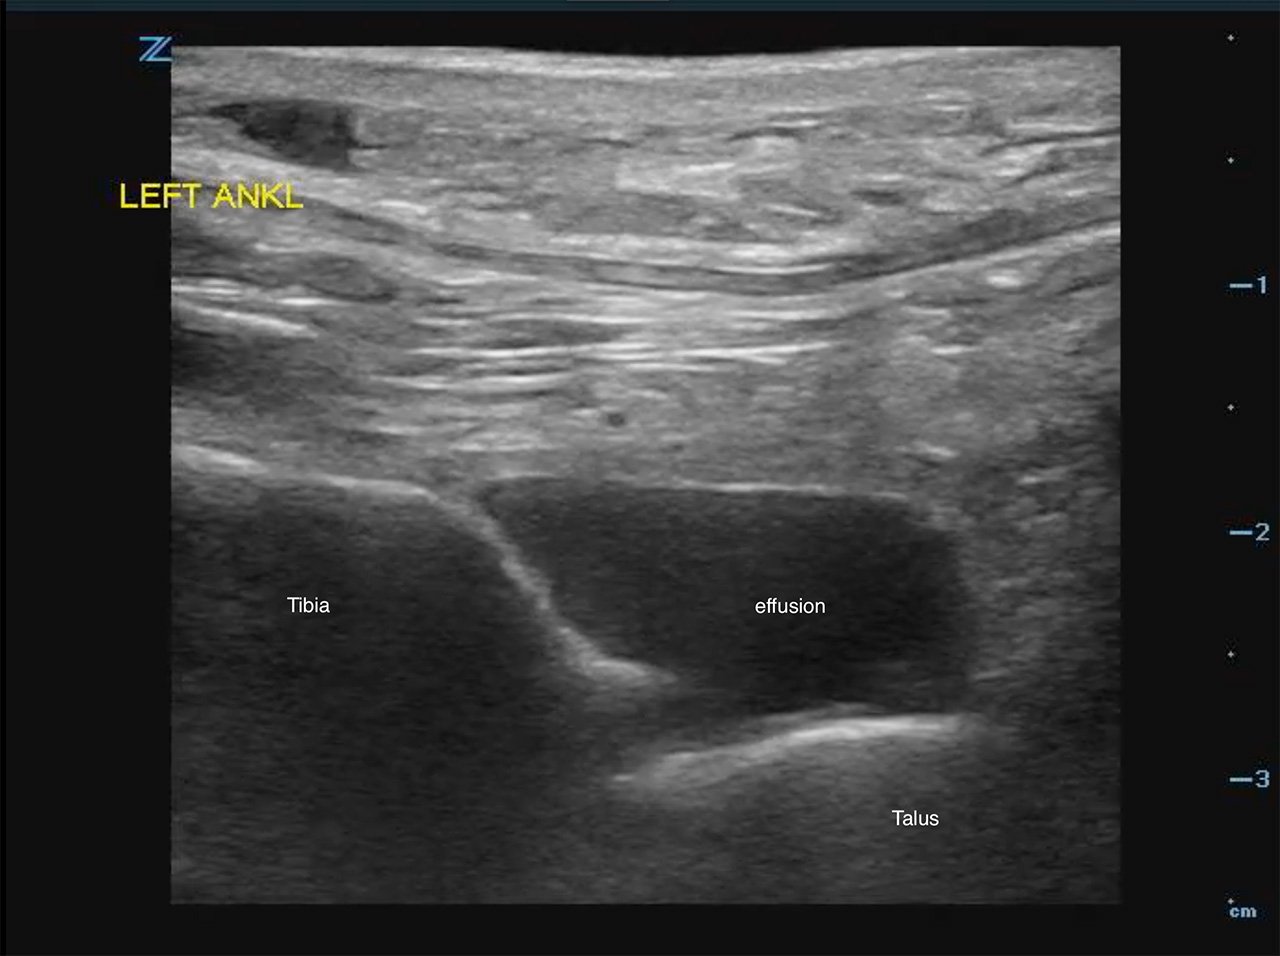
- Figure 2b. Ultrasound demonstrating tibiotalar effusion
- Out of plane technique is recommended to aspirate this joint.3
Knee
- Transducer in the sagittal plane, anterosuperior to the patella (Fig. 3)
- Figure 3. Transducer placement for knee arthrocentesis
- Linear transducer
- In this view you should be able to identify the quadriceps tendon attached to the patella.
- Deep to the tendon and proximal to the patella you should be able to identify the suprapatellar fat pad superficial to the femur. (Fig. 4)

- Figure 4. Ultrasound demonstrating normal knee
- This will be displaced by joint effusion when a significant amount of fluid exists in this space.4 (Video 1)
- Video 1. Joint effusion displacing suprapatellar fat pad
- Identify this pocket of fluid and rotate your linear ultrasound probe 90 degrees counterclockwise. (Fig. 5)
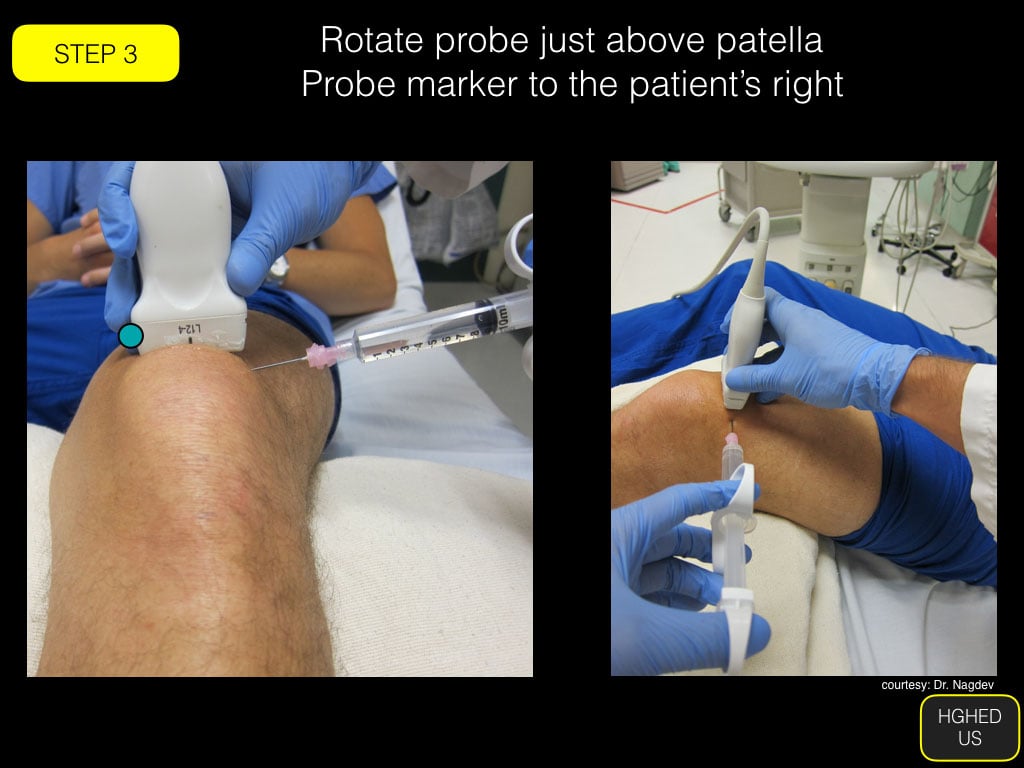
- Figure 5. Transducer and needle placement for in-plane arthrocentesis
Hip
- Anterior to hip
- Curvilinear transducer (linear in children)
- Transducer inferior to the inguinal ligament slightly rotated toward the umbilicus (Fig 6)
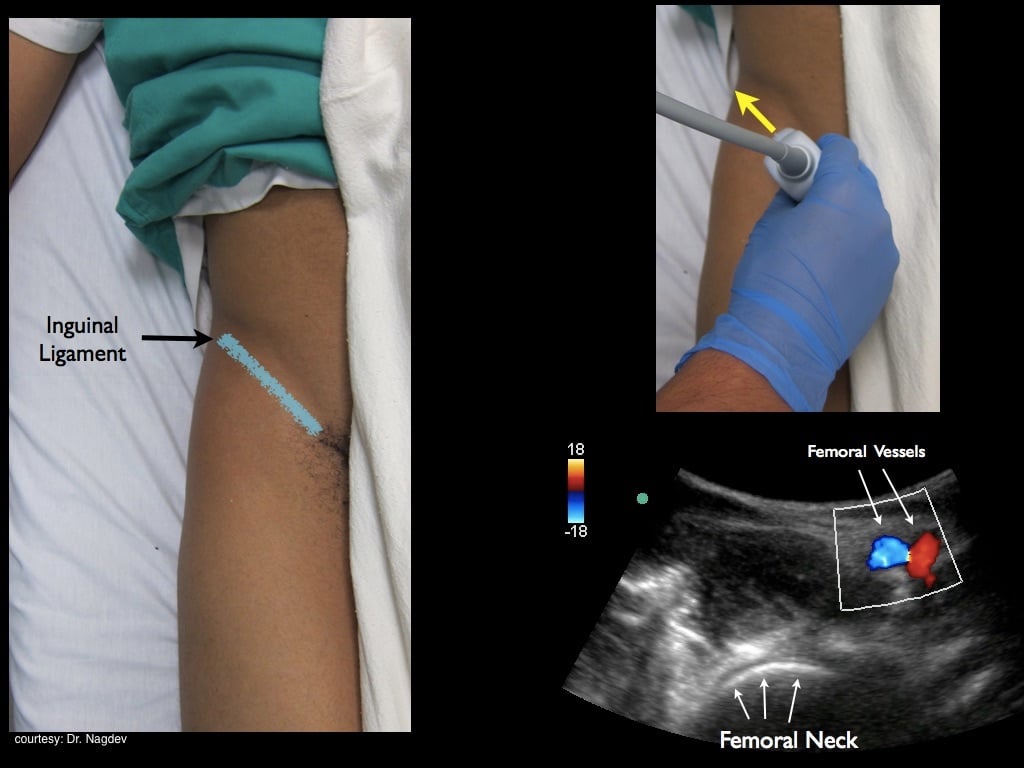
- Figure 6. Transducer placement for hip arthrocentesis
- Visualize the femoral neck extending to the femoral head
- Visualize the femoral vessels and avoid them by moving laterally
- Effusion is identified as a hypoechoic area along the femoral head/ neck within the hyperechoic capsule.5 (Fig. 7)
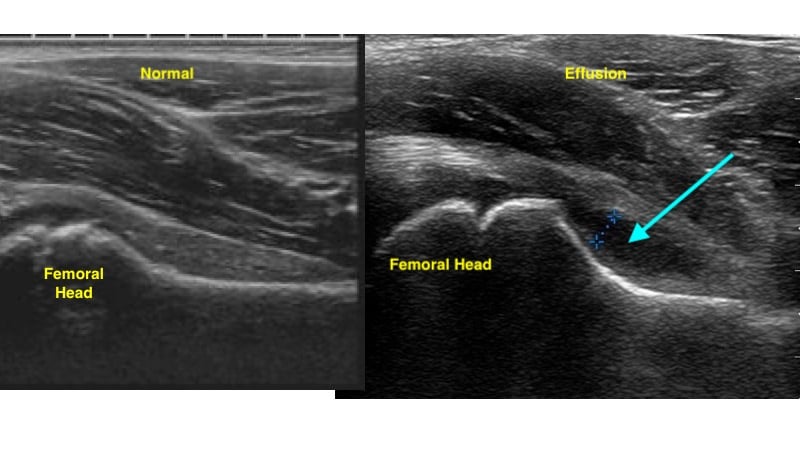
- Figure 7. Ultrasound demonstrating normal hip (left) and hip effusion (right)
Shoulder
- Posterior approach
- Linear or curvilinear transducer (choice based on body habitus)
- Transducer transverse below the scapular spine. Marker to the patient’s left (Fig. 8)
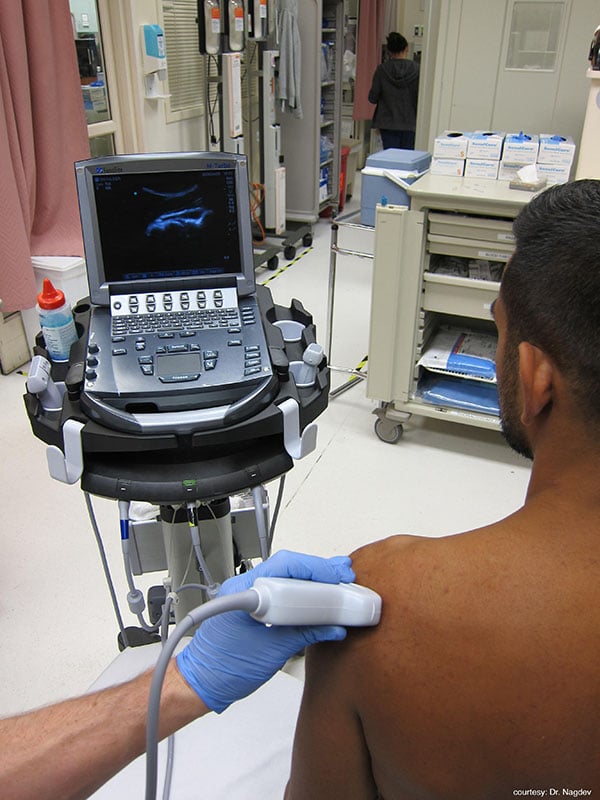
- Figure 8. Transducer placement for shoulder joint evaluation
- Scan laterally toward the humerus to obtain a view of the humeral head, glenoid fossa and superficially the infraspinatous tendon.6 (Fig. 9, Video 2)
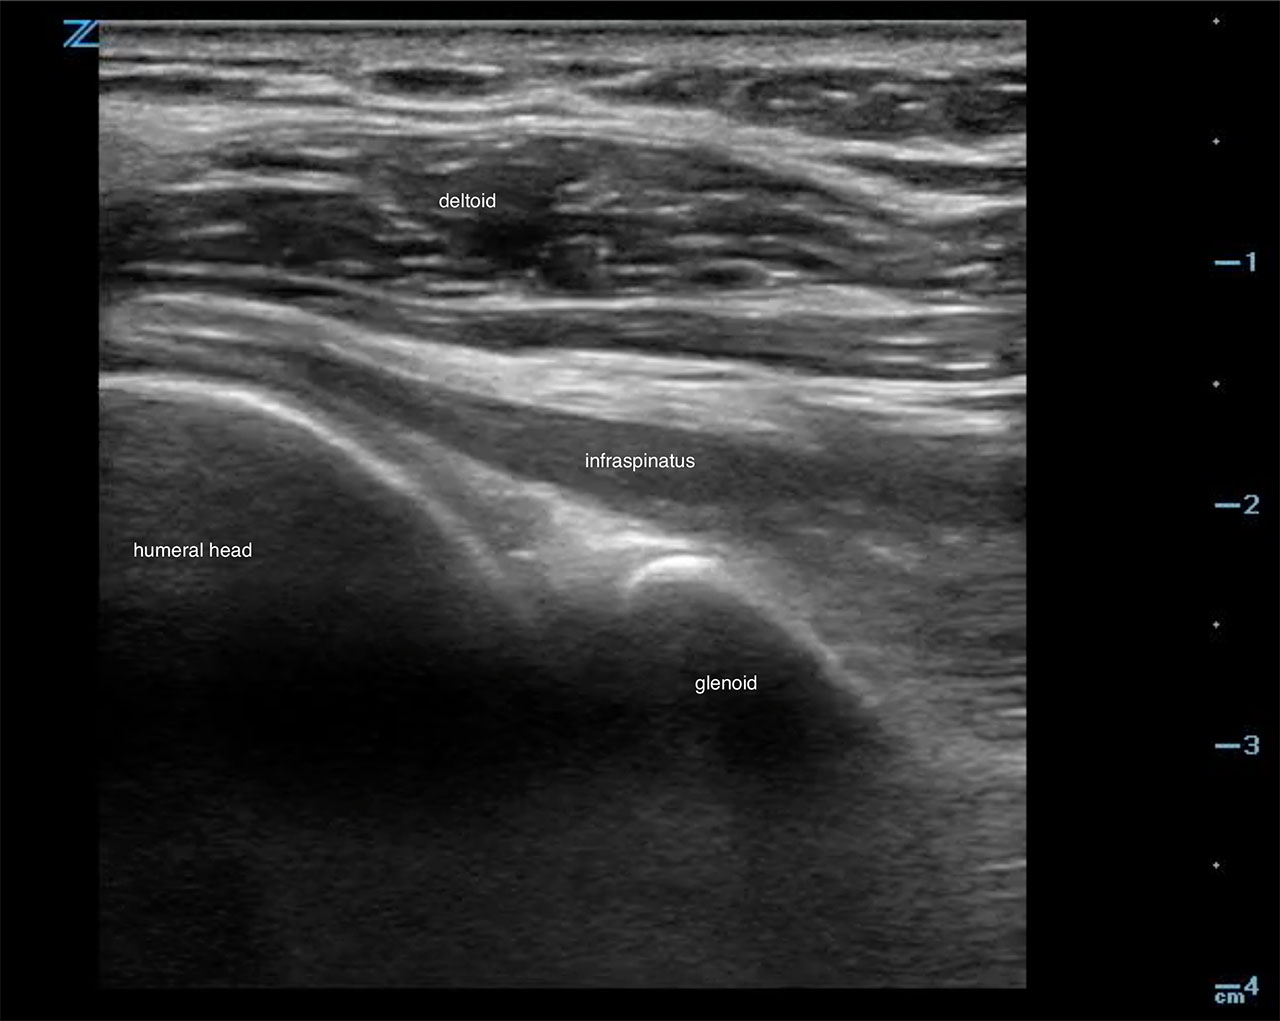
- Figure 9. Ultrasound demonstrating normal shoulder
- Video 2. Ultrasound demonstrating normal shoulder motion with internal and external rotation
- An effusion is an anechoic collection just above the head of the humerus
Elbow
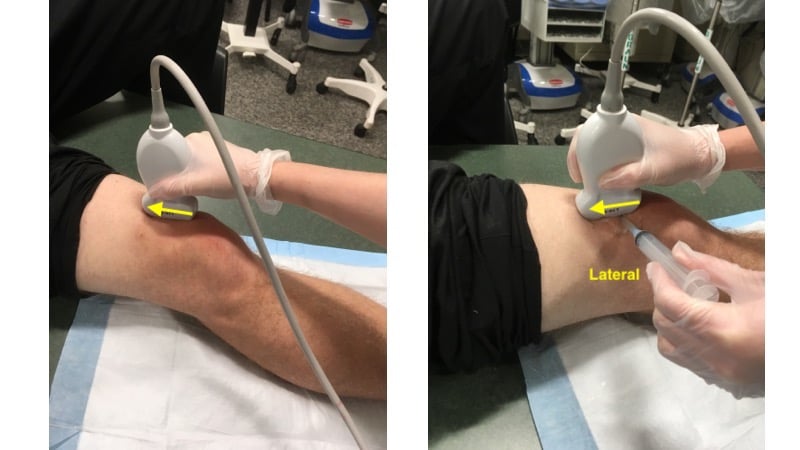
- Lateral approach preferable for arthrocentesis
- Linear transducer
- Laterally against the proximal forearm parallel to the radius shaft (Fig. 10)
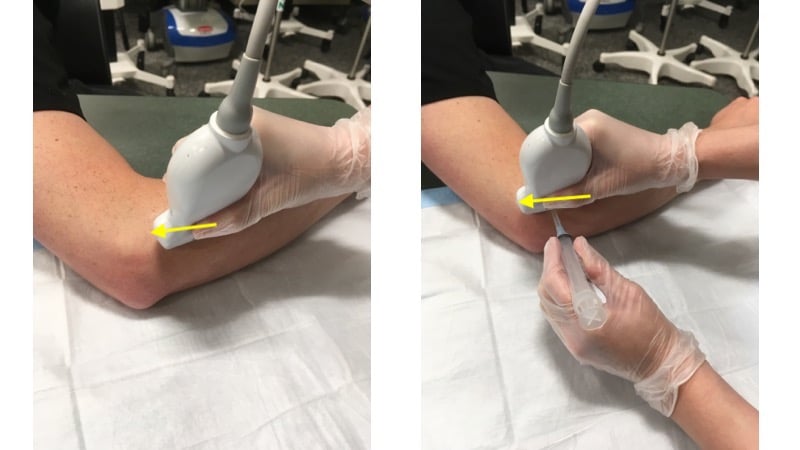
- Figure 10. Transducer placement for elbow arthrocentesis
- Scan proximally to the lateral epicondyle to visualize the space between the radial head and lateral epicondyle.7 (Fig. 11)
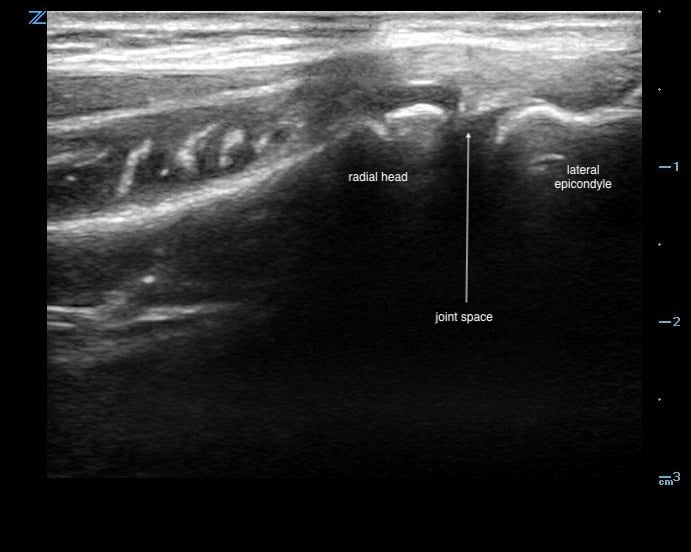
- Figure 11. Ultrasound demonstrating normal radiohumeral joint space
- An effusion is an anechoic collection within this space. (Video 3, 4)
- Video 3. Ultrasound demonstrating radiohumeral joint effusion
- Video 4. In-plane ultrasound guided radiohumeral (elbow) arthrocentesis
- Alternatively, the elbow may be viewed posteriorly, with the patient’s elbow held in 90-degree flexion and the transducer placed in the transverse orientation. (Fig. 12)
- Figure 12. Transducer placement for posterior elbow joint arthrocentesis
- Posterior fat pad is seen within the “valley” of the olecranon fossa. (Fig. 13)
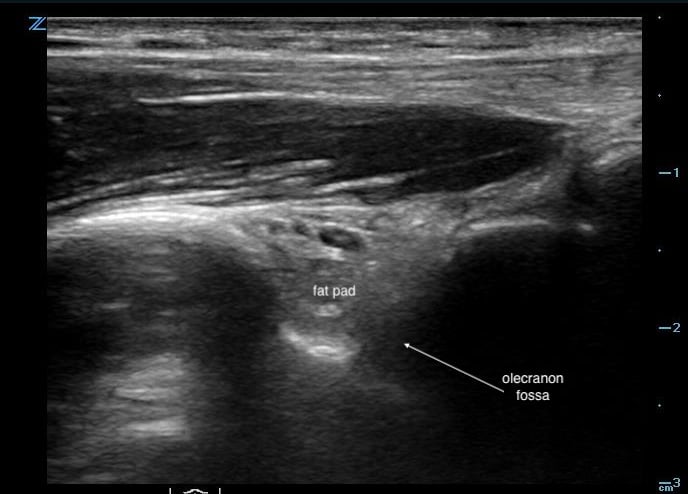
- Figure 13. Ultrasound image demonstrating normal posterior fat pad
- Hypo/anechoic effusion will displace the fat pad “upwards” out of the fossa, giving impression of an “overflowing cup” sign. (Video 5)
- Video 5. Ultrasound demonstrating displacement of posterior fat pad by effusion
IV. Positioning
- Ankle - Supine position, knee flexed and plantar surface of foot flat on the stretcher
- Knee - Supine position, knee in slight flexion (consider a pillow or rolled towel under the knee)
- Hip - Supine position, flexed knee with hips externally rotated in “frog leg position”
- Shoulder - Sitting upright, affected arm adducted, facing away from the clinician
- Elbow - Sitting upright, arm abducted, elbow flexed 90 degrees, forearm pronated
V. Normal Findings
Seeing the above-described anatomy of each joint without a fluid collection in the joint space.
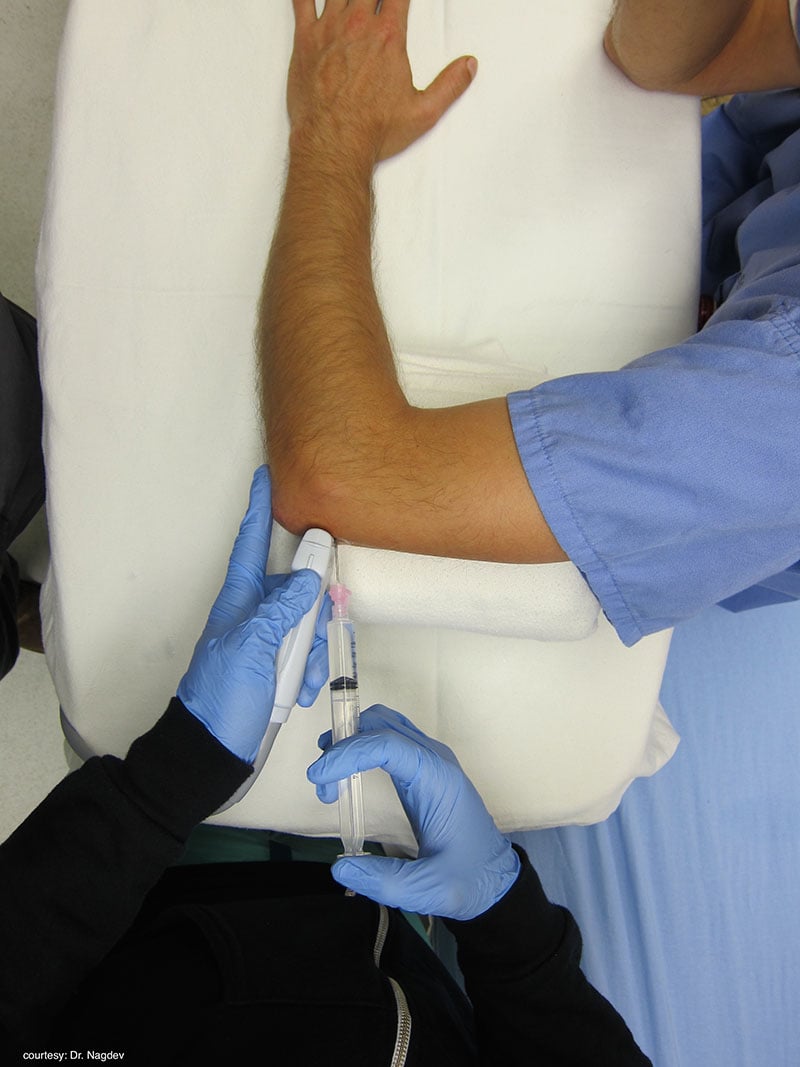
VI. Procedure
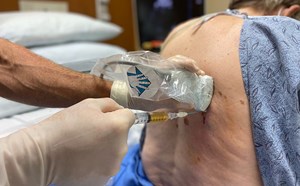
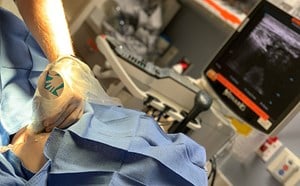
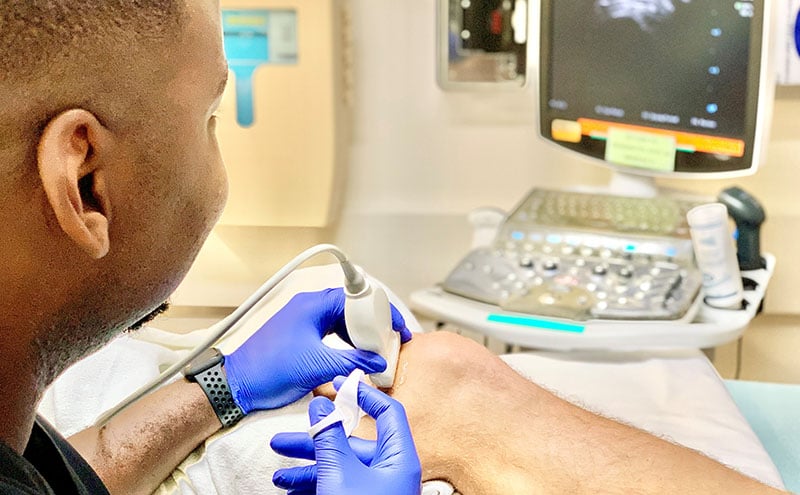
- You may evaluate the joint without a sterile field but for ultrasound guidance during the procedure maintain a sterile field at all times.
- Sterile conditions include a sterile probe cover and sterile coupling gel
- Administer a small wheel of lidocaine superficially in the skin over the effusion.
- Enter the skin with an 18-gauge needle with a 10mL syringe. A spinal needle should be considered for hip aspiration
- Either in or out of plan techniques can be used.
- In plane allows for better visualization of the needle tract. However, novice users are typically more comfortable using the out of plan technique.
- When using the out of plane technique be aware the needle tip can pass the imaging plane of the transducer and the fluid pocket and needle entry should be centered on the screen.
- Observe your needle entering the subcutaneous tissue on ultrasound and follow your needle tip as it enters the fluid pocket aspirating as you progress.
- You should feel fluid flow back into the syringe as you enter the capsule.
- Aspirate as much fluid as clinically indicated.
- Remove the needle and hold pressure until hemostasis is achieved.
- Either in or out of plan techniques can be used.
VII. Pearls and Pitfalls
Pearls
- One can scan the contralateral joint for comparison
- Always confirm effusion before aspiration8
- Color Doppler can be utilized to help identify any vascular structures
Pitfalls
- Failure to maintain sterility
- Sterile probe covers, sterile gloves, sterile coupling gel, sterile drape
- Moving the transducer during the procedure and losing needle visualization
- Not evaluating the joint space and identifying anatomy/relevant structures prior to aspiration
VIII. References
- Sibbitt WL, Kettwich LG, Band PA, et al. Does ultrasound guidance improve the outcomes of arthrocentesis and corticosteroid injection of the knee? Scand J Rheum. 2011;41:61-72.
- Wiler JL, Costantino TG, Filippone L, et al. Ultrasound in emergency medicine comparison of ultrasound- guided and standard landmark techniques for knee arthrocentesis. J Emerg Med. 2010;39:76-82.
- Washington T, Taylor T, Beck S, et al. Ultrasound-guided arthrocentesis of the ankle. Emerg Med. 2017;49(7):329-31.
- Johnson B, Lovallo E, Mantuani D, et al. How to perform ultrasound-guided knee arthrocentesis. ACEPNow. 2015;34(8):16-7.
- Naing L, Fredericks P, Colla JS. Ultrasound-guided hip arthrocentesis. Emerg Med. 2017;49(1):37-8.
- Nagdev A. Ultrasound-guided glenohumeral joint evaluation and aspiration. ACEPNow. 2016;35(6):17.
- Mantuani D, Nagdev A. Ultrasound-guided elbow arthrocentesis. ACEPNow. 2013;32(9).
- Adhikari S, Blaivas M. Utility of bedside sonography to distinguish soft tissue abnormalities from joint effusions in the emergency department. J Ultrasound Med. 2010;29:519-26.