Tips and Tricks: Best Practices for Ultrasound-Guided IV Placement
Background
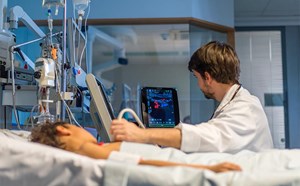
Placement of an ultrasound-guided peripheral intravenous line (USPIV) has become an essential skill for any emergency physician. These lines are more successful than blind external jugular vein access and compared to central venous catheters they are less invasive and carry less complications.1,2 Despite this being a common procedure, there remains considerable practice variation.3 Using the best available literature and our clinical experience, here we outline practice recommendations.
Site Selection
- Select an adequate site for cannulation:
- Asking the patient about previously successful IV sites can be helpful
- Apply the tourniquet as close to the axilla as possible as this leads to better venous distention3
- Using standard ultrasound gel, scan the patient’s arm to identify a suitable vessel
- Veins between 0.3-1.5 cm from the surface have been associated with more successful cannulation and vessels less than 1.2 cm from the surface are correlated with longer sustainability3
- Vessels larger than 0.4 cm have a higher cannulation success rate.3
- Targets on the upper medial arm are generally more easily visualized (basilic and deep brachial veins), however proximal arm may be more reliable
- Use both compression and color flow to ensure target is truly a vein
- Look for other structures (arteries, nerves) that could potentially be injured and avoid them3
- Trace the course of the vein to identify bifurcations, clots, or valves
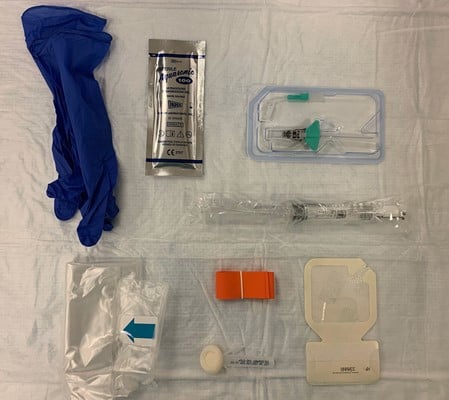
Figure 1. Supplies required for USPIV insertion. Clockwise from upper left (nonsterile gloves, sterile single-use gel, long IV catheter, saline flush, catheter dressing, tourniquet and skin prep, probe cover)
Positioning
- Position the patient to optimize provider comfort (Fig. 2)
- Place the ultrasound on the contralateral side to the site of the patient in the operator’s field of view3
- Raise the bed to a comfortable height to perform the procedure
- Sitting is often preferable
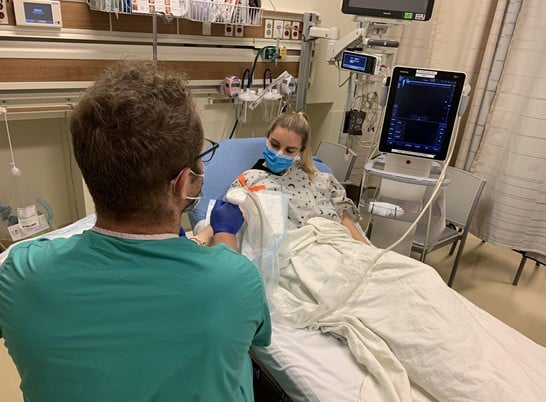
Figure 2. Appropriate provider positioning
Technique
Two techniques have been described: the short axis (transverse, out of plane) approach and the long axis (in plane)
-
- Superiority of one approach over the other remains controversional.3
- Operators should learn both as they are useful skills for central venous catheter placement and nerve blocks
- Short Axis
- Visualize the vein in cross-section (Fig. 3)
- Follow the needle tip until it enters the vein. (Fig. 4)The needle tip is followed into the lumen of the vessel. It is essential that the transducer is advanced before the needle tip so as not to mistake the needle shaft for the tip and risk potential damage to the posterior wall of the vessel. Advance the needle tip in conjunction with the transducer for 1-2 cm additionally to ensure enough of the catheter is in the vessel.3 (Fig. 5)
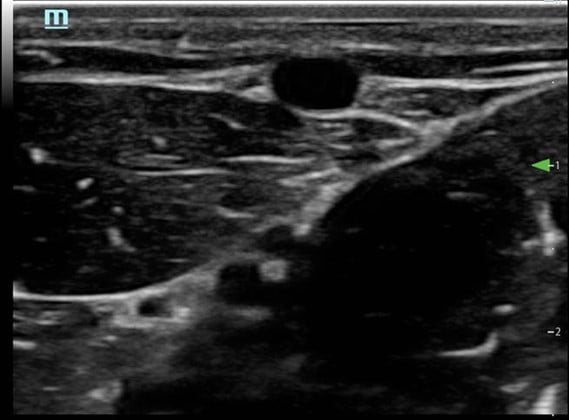
Figure 3. Short axis approach: vein visualized in cross axis
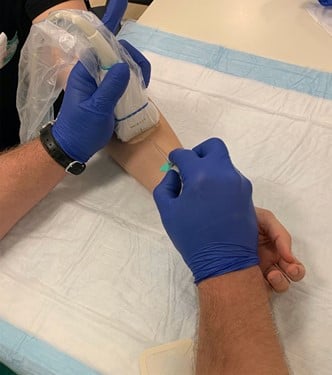
Figure 4. Short axis approach: Entering the vessel
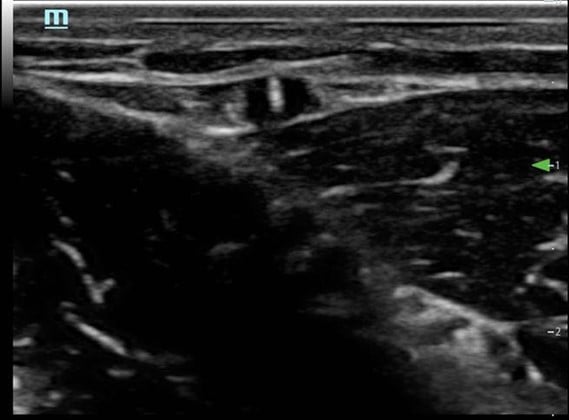
Figure 5. Short axis approach: Needle tip entering vessel
Long Axis
- Needle and vessel kept in the same plane (Fig. 6)
- Transducer should remain stationary as needle enters the skin
- Needle advances in the vessel (Fig. 7)
- Needle should be followed into the lumen of the vessel
- Sufficient catheter (1-2cm) should be seen in the vessel3 (Fig. 8)

Figure 6. Long axis approach: Vessel appearance
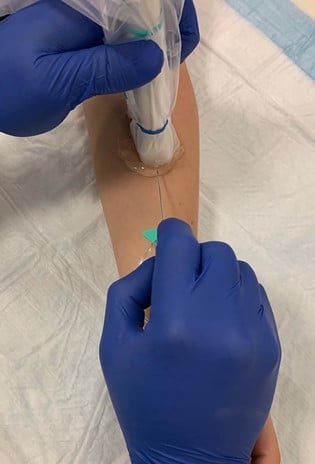
Figure 7. Long axis approach: entering the vessel
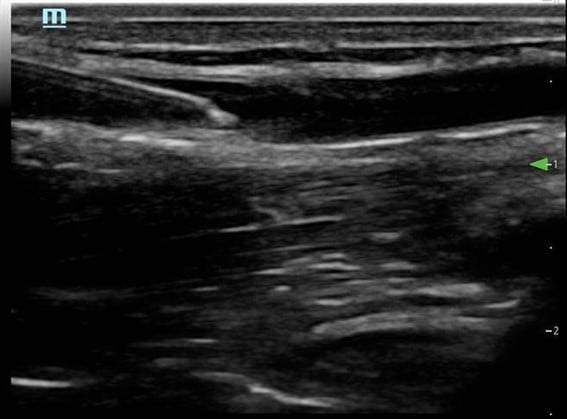
Figure 8. Long axis approach: needle and catheter in vessel
Confirmation and Securing
- Do not confirm with blood flash as the image can be lost
- Confirm by visualization in the vessel, blood aspiration and saline flush with saline
- Secure catheter using standard departmental procedure, ensuring that all residual ultrasound gel is cleaned from the site
Sterility
- Large amount of practice variation but a lack of high-quality evidence.3
- ACEP recommends a single use probe cover with sterile gel while inserting USPIVs4
- ACEP does not specify whether the probe cover should be sterile
- No comment on glove use
- No studies comparing sterile to non-sterile glove use
- USPIVs inserted with non-sterile gloves have similar infection rates to PIVs inserted by landmark with non-sterile gloves4
- We recommend a probe cover and sterile gel, but do not require sterile gloves.
- Several options of probe cover exist (probe covers typically used in CVC placement, adhesive films (eg, 3M Tegaderm), wrist portion of sterile gloves4
- Tegaderm and other adhesive dressings can damage probe lenses and are not recommended by ultrasound manufacturers
- Kittisarapong in the Sept. 2019 edition of this newsletter provided an excellent overview of several new probe cover options
- Not all of these are routinely stocked in many emergency departments
- We recommend each department development a policy considering local resources
- Non-sterile ultrasound gel and equipment is a vector for infectious organisms including MRSA4
- Ultrasound equipment should be properly disinfected
- Once site is selected, non-sterile gel should be removed, and IV site cleaned
- Probes and contaminated portions of the machine should be cleaned with manufacturer-approved sanitizing wipes
Conclusion
Ultrasound-guided peripheral IV insertion is an essential skill for emergency physicians. Despite this being a common procedure, there is still wide variation in practice. Though evidence is lacking in this area, based on the available data and existing practice guidelines we recommend careful selection of site and appropriate patient positioning, that practitioners become adept at both short axis and longitudinal approaches for USPIV placement, and that providers use sterile gel, a single use sterile probe cover, and clean the probe and machine after each use. We hope to have specified some best practices and clarified some of the controversy surrounding this procedure.
References
- Costantino TG, Kirtz JF, Satz WA. Ultrasound-guided peripheral venous access vs. the external jugular vein as the initial approach to the patient with difficult vascular access. J Emerg Med. 2010;39(4):462-7.
- Au AK, Rotte MJ, Grzybowski RJ, et al. Decrease in central venous catheter placement due to use of ultrasound guidance for peripheral intravenous catheters. Am J Emerg Med. 2012;30(9):1950-4.
- Gottlieb M, Sundaram T, Holladay D, et al. Ultrasound-guided peripheral intravenous line placement: a narrative review of evidence-based best practices. West J Emerg Med. 2017;18(6):1047-54.
Mirsch D, DO, Lewiss R, MD, Au A, MD. Ultrasound guided peripheral IV: It’s time to clean up our act. ALiEM. Sep 2018. Available here.
Carl Preiksaitis MD
Emergency Medicine PGY3, Department of Emergency Medicine, Stanford School of Medicine
Nick Ashenburg MD
Director, Emergency Ultrasound in Resident and Medical Student Education, Department of Emergency Medicine, Stanford School of Medicine