Six Steps to Mastering your Echocardiography Skills
From the Medical Student Education Subcommittee of the ACEP Emergency Ultrasound Section
Introduction
Good luck is the residue of preparation.
- Jack Youngblood, NFL “Tough Guy,” Pro Football Hall of Famer, and broadcaster
This is Mr. Youngblood’s take on the old adage “it’s better to be lucky than good,” because being consistently lucky requires first that you have thoroughly prepared with practice. What does this have to do with echocardiography (which I will henceforth abridge to “echo”) or ultrasound? Well, many practitioners of point-of-care ultrasound (POCUS), aside from training on basic knobology focused on depth and gain adjustment, have few opportunities to learn to troubleshoot their image acquisition. Novice sonographers hope to place the probe on the rough location of the body and strike sonographic gold. This is very true for echo, as the heart is a tremendously complicated organ that can only be visualized in two-dimensions, at any given time, by ultrasound. Being able to recognize the scan plane that you’re in, in relation to the 3D structure, and being able to predict which movements will yield the anticipated scan plane, takes significant dedicated practice. Recognizing this as the goal of echo is the crucial first step.
It doesn’t help that most instructional videos and texts on performing echo feature pristine echo images, with few actually tackling the issue of how to acquire and troubleshoot windows. It’s assumed that you already know these troubleshooting techniques, but there are few published guides on troubleshooting echo acquisition. My own experience learning echo was first in the ED, where I was taught by other residents and attendings to “put it here, and point here,” and essentially to work with the usually not optimal image obtained. My echo technique improved dramatically when I took an echo elective, where everyday for one month I learned and practiced with the cardiac sonographers. A seasoned cardiac sonographer is undeniably the best--and luckiest--practitioner in the room. But even after thousands of echos, they take the time to optimize their windows, because so much of what they do depends on the correct scan plane, insonation angle, and time frame. For example, EPSS should be done with the scan plane in the center of the left ventricle, with an insonation angle perpendicular to the interventricular septum, and measured during early diastole. Even subtle alterations in any of these variables will often lead to dramatically different measurements.
In emergency medicine, one rarely has more than 5-10 minutes to perform a POCUS study, so planimetry, in addition to its many limitations, is simply not time-effective. But that doesn’t mean that spending the time to improve image acquisition is not worthwhile. In fact, learning to recognize suboptimal images and the techniques to correct them consistently, saves time. But it requires that learners adopt this deliberate approach of understanding how the scan plane is slicing through the three-dimensional heart, and which movements are needed to obtain the correct image. I have distilled down my experience over hundreds of bedside echo teaching sessions to develop this simple approach to echo. (https://youtu.be/1mhitYUiAbI)1 In this first of a two-part series, we will go over this six-step process. This method focuses initially on obtaining the parasternal long axis window. Mastery of this view should help in obtaining the parasternal short axis and apical 4 chamber windows.
1. Be surgical with the probe.
Just as a surgeon does not hold their scalpel at the handle, but close to the blade, hold the probe close to the head. Stabilize the probe by anchoring your fourth or fifth fingers, or palm, onto the patient’s skin to avoid unintentional movement.
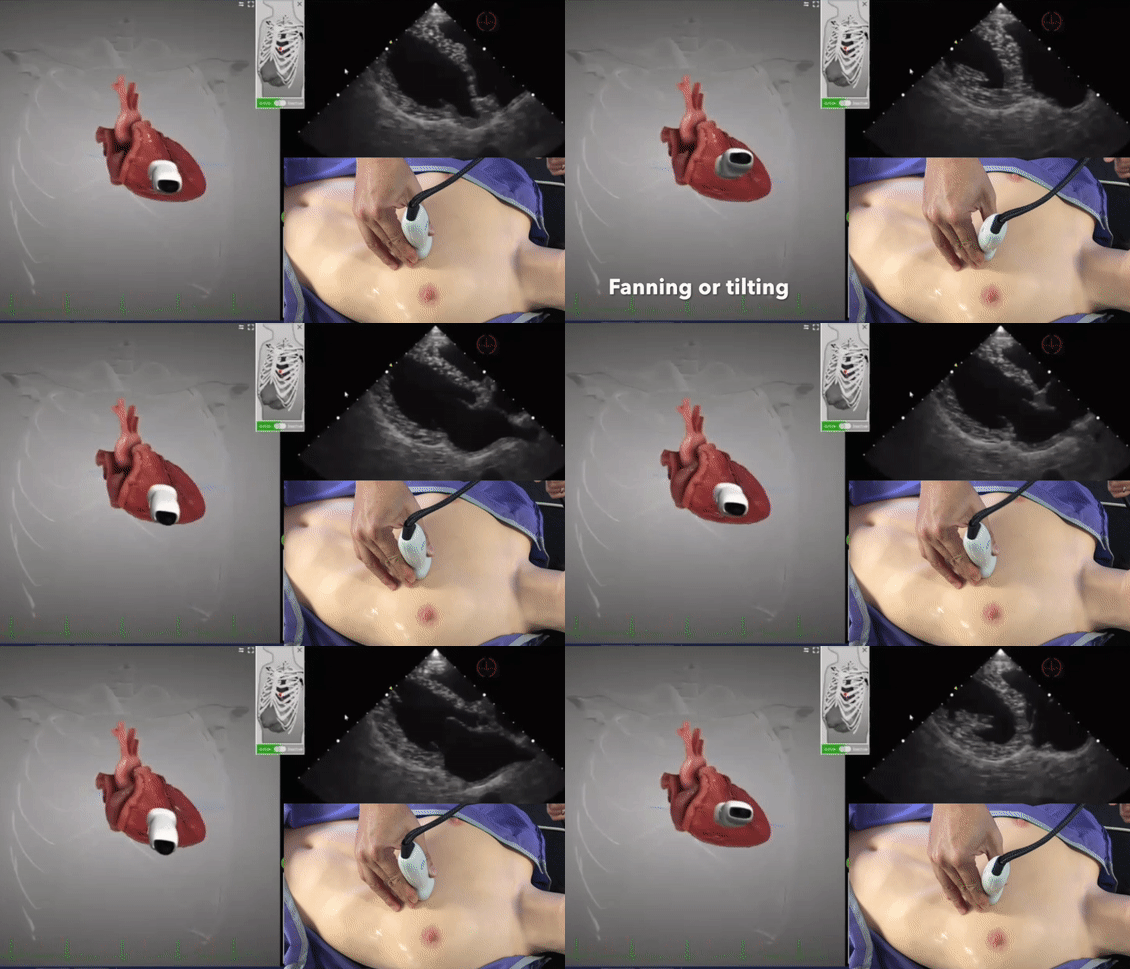
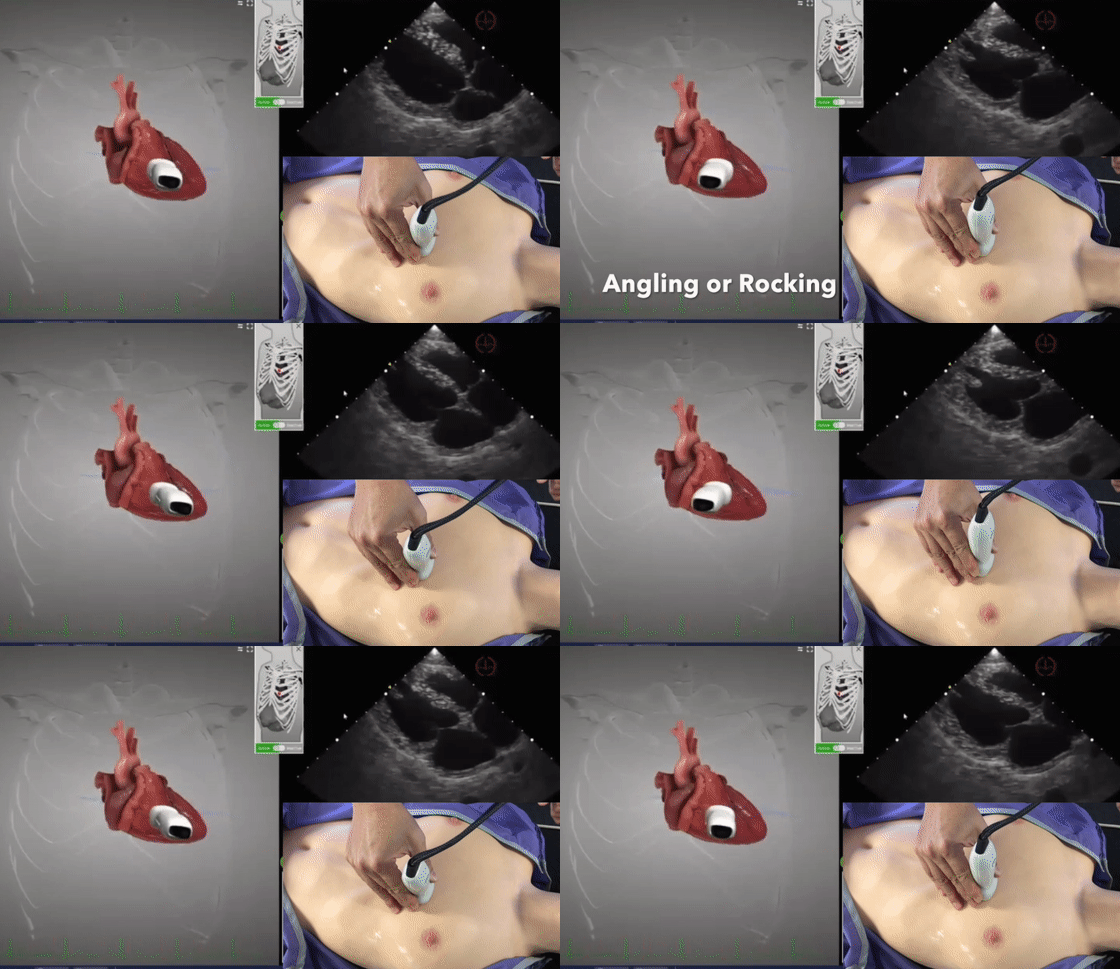
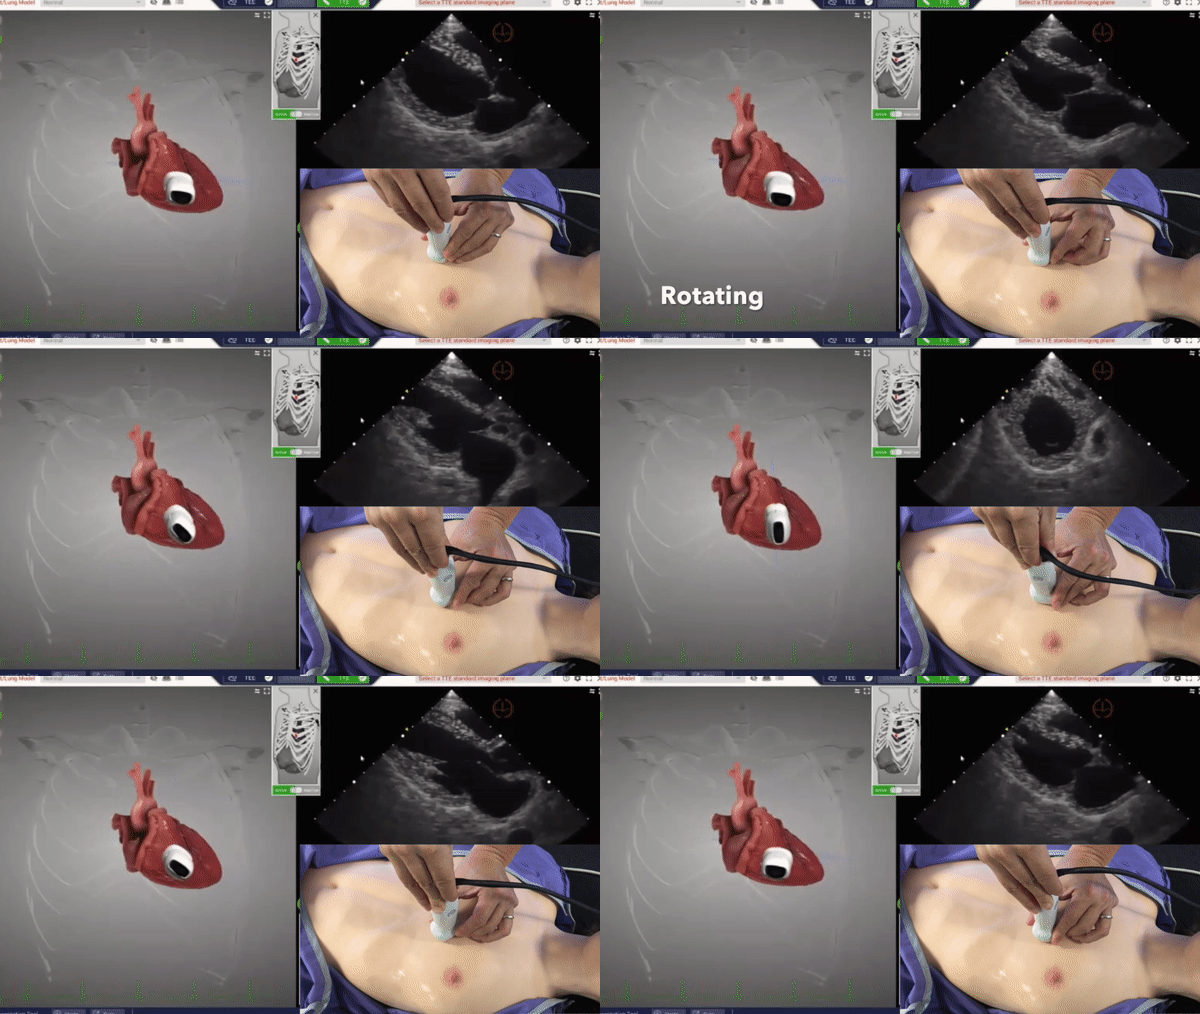
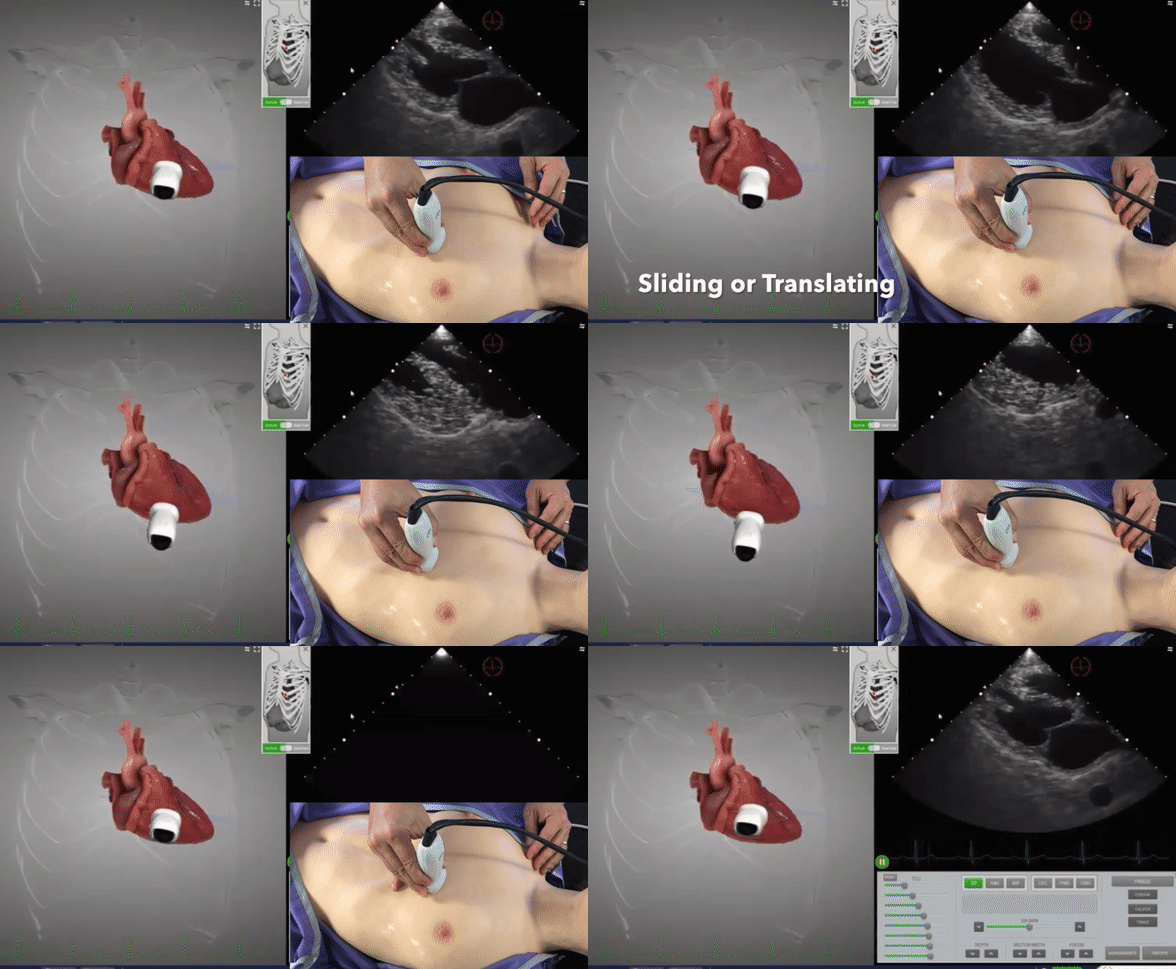
Similarly, as a surgeon does not slash at a layer of fascia without regard to potentially important structures underneath, but patiently dissects through each layer, learn to be deliberate about each of the four main probe movements.2 First, each probe has two broad sides and two narrow sides. Fanning or tilting is the side-to-side movement along the broad side, while angling or rocking is the side-to-side movement along the narrow side. (Fig. 1, 2) Movement around the axis formed by the head of the probe to the handle is called rotation. (Fig. 3) Recognize that the movement of the probe leads to an opposite scan plane. For example, by tilting the probe handle inferiorly, the scan plane is actually directed superiorly, and vice versa. The last movement is actually translating or sliding the probe to a different position on the chest wall. (Fig. 4)
It is paramount that you isolate these movements, eg, when you are tilting, take care to not rock or rotate the probe. As mentioned previously, you will learn echo best when you can understand the cross-sectional anatomy of the scan plane, and are able to anticipate the anatomical changes of your probe movements. If you are performing more than one probe movement at any given time, this will be difficult to practice.
Figure 1. Fanning or Tilting
Figure 2. Angling or Rocking
Figure 3. Rotating
Figure 4. Sliding or Translating
2. Find a good intercostal window to use, understanding that the surface anatomy does not uniformly correspond to cardiac anatomy.
If placing the probe on the 3rd or 4th intercostal space with the indicator pointed to the right shoulder (or left elbow, depending on the convention) consistently yielded an adequate parasternal long axis window, then echo would truly be easy for all novices. However, there is significant variation between the position of the heart and the surface anatomy. For example, patients with ascites or elevated left hemi-diaphragms have hearts situated more superiorly, with a leftwardly displaced apex. Patients with obstructive lung disease or long thoraces, tend to have more inferiorly displaced hearts with apexes that are more rightward.
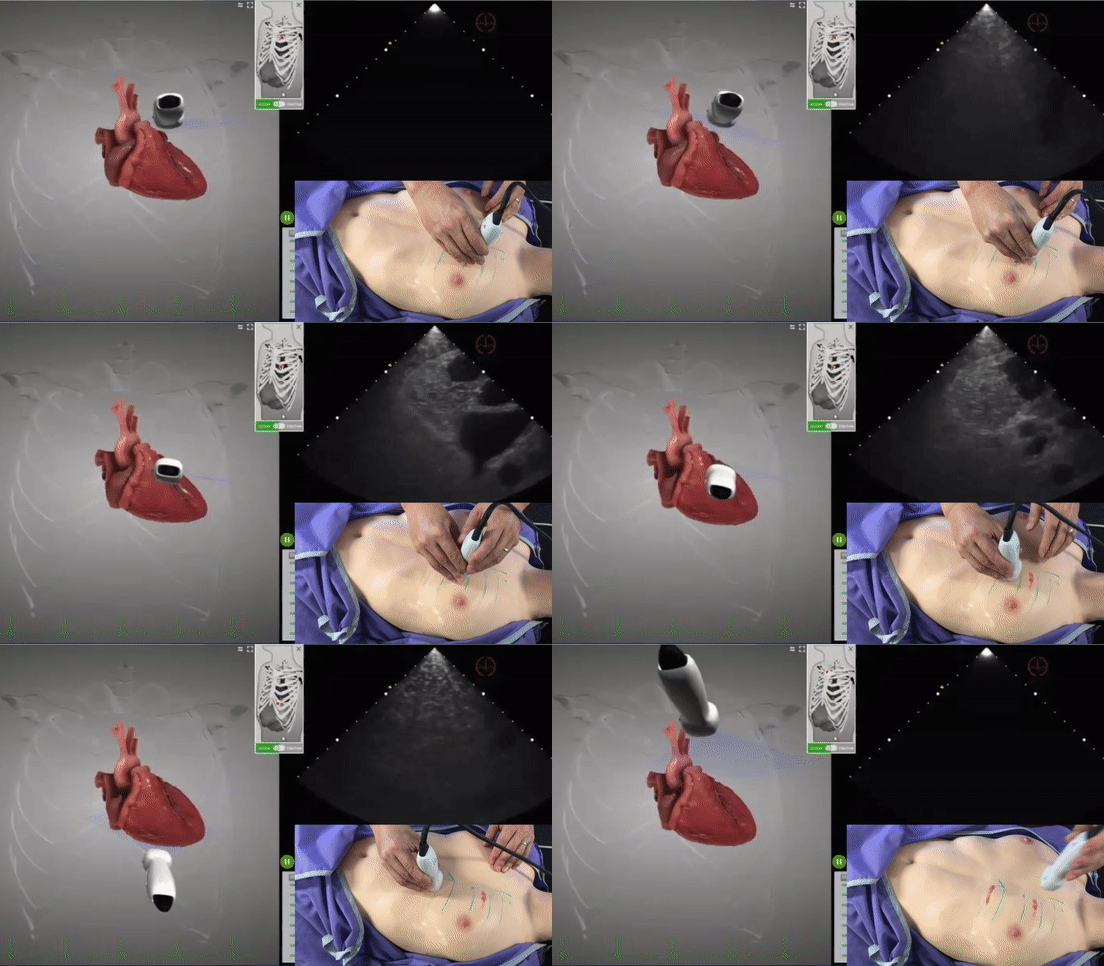
If the surface anatomy is not reliable in terms of probe placement, what can you do? Learn to recognize the bony anatomy by palpating the sternum and the ribs. This will give you a mental image of the intercostal spaces available for scanning. Think of these spaces as “windows” to send your ultrasound beams to the deeper cardiac structures. When first learning echo, get a sense of the superior and inferior heart borders by placing the probe on a high intercostal window (say, the second intercostal space) and scan inferiorly in each intercostal space. Note if there are A and/or B lines--which means the probe is over lung--as well any bone shadowing that would mean that the probe is over a rib. (Fig.5) Note intercostal windows that yield cardiac structures and that are relatively free of lung or rib artifact. There are usually 2-3 intercostal windows that meet this criteria for most patients. Find the intercostal window that gives the best definition of the myocardial walls. At this intercostal window, the insonation angle is perpendicular to the walls, giving the best image. Plant your palm or fingers to this intercostal window, because this is the best window for obtaining your parasternal long axis.
Figure 5. Finding a good intercostal window
3. Fan or tilt the probe to obtain the center of the left ventricle.
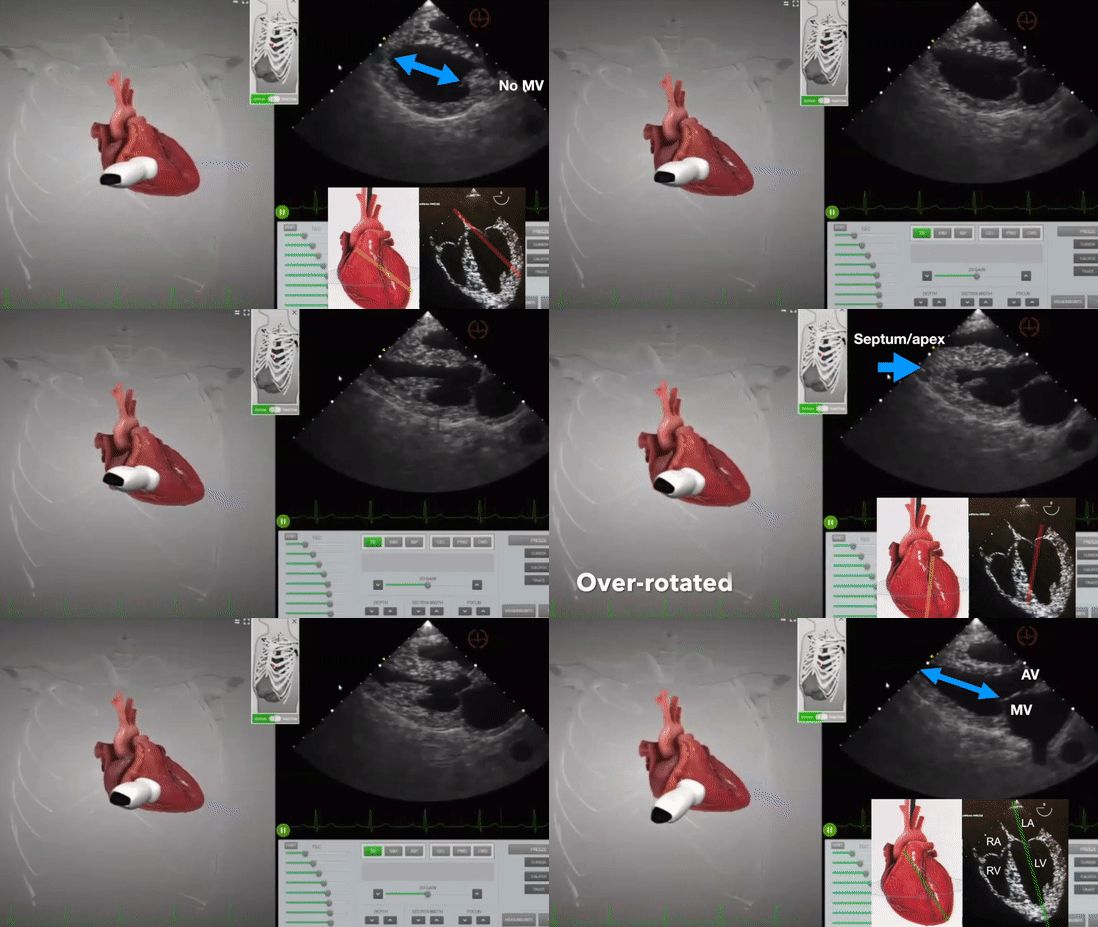
Now that you have a good intercostal window, the next step is to fan or tilt the probe to find the center of the left ventricle. At this scan plane, both the aortic and mitral valves will be seen. In addition, there will be no or a minimum of papillary muscle. If the scan plane is tilted too superiorly, the lateral wall of the LV is seen. If the scan plane is tilted too inferiorly, the septal wall of the LV will be seen. (Fig. 6) Remember to isolate the probe movement to fanning or tilting, and avoid rocking or rotating the probe at this point.
Figure 6. Fanning or tilting to find the center of the left ventricle
4. Rotate the probe to obtain the true long axis.
Now that the scan plane is in the LV center, it is time to find the LV long axis. This is the line from the LV apex to the aortic valve. In order to do this, slowly rotate the probe clockwise until the LV appears maximally elongated. If the LV appears to round out, the scan plane is off axis. So rotate counterclockwise until the LV appears maximally elongated again. At this point, there may be some inadvertent probe movement so that the scan plane may be off-center. Slightly fan or tilt to reimage the center of the LV. (Fig. 7)
Figure 7. Rotating to find the long axis
5. Rotating to the parasternal short axis
Congratulations! You have just obtained a parasternal long axis window. Note where the indicator dot is pointed and picture the patient’s true long axis, seen as a red line here. (Fig. 8) This long axis will lead you to the parasternal short axis window. By rotating the probe clockwise 90 degrees, you will obtain the parasternal short axis. If the LV appears off-center, angle (or rock) the probe handle away from the direction that the LV is situated on the screen. For example, if the LV appears on the left side of the screen, the scan plane is slightly lateral to the LV. Angle the probe handle to your right (or the patient’s left), which points the scan plane medially. The result will be that the LV now appears in the middle of the screen.
In part two, we will discuss the different levels of the parasternal short axis, as well as the apical windows. However, realize that by sliding the probe along the patient’s long axis, you can acquire these different levels of the parasternal short axis. Remember not to fan or tilt as you slide the probe. Off-perpendicular or oblique windows of the parasternal short axis may lead to false estimations of relative chamber size or even a falsely flattened septum (ie, the “D sign”). Thus, the American Society of Echocardiography does not recommend fanning or tilting to find different levels of the parasternal short axis.3
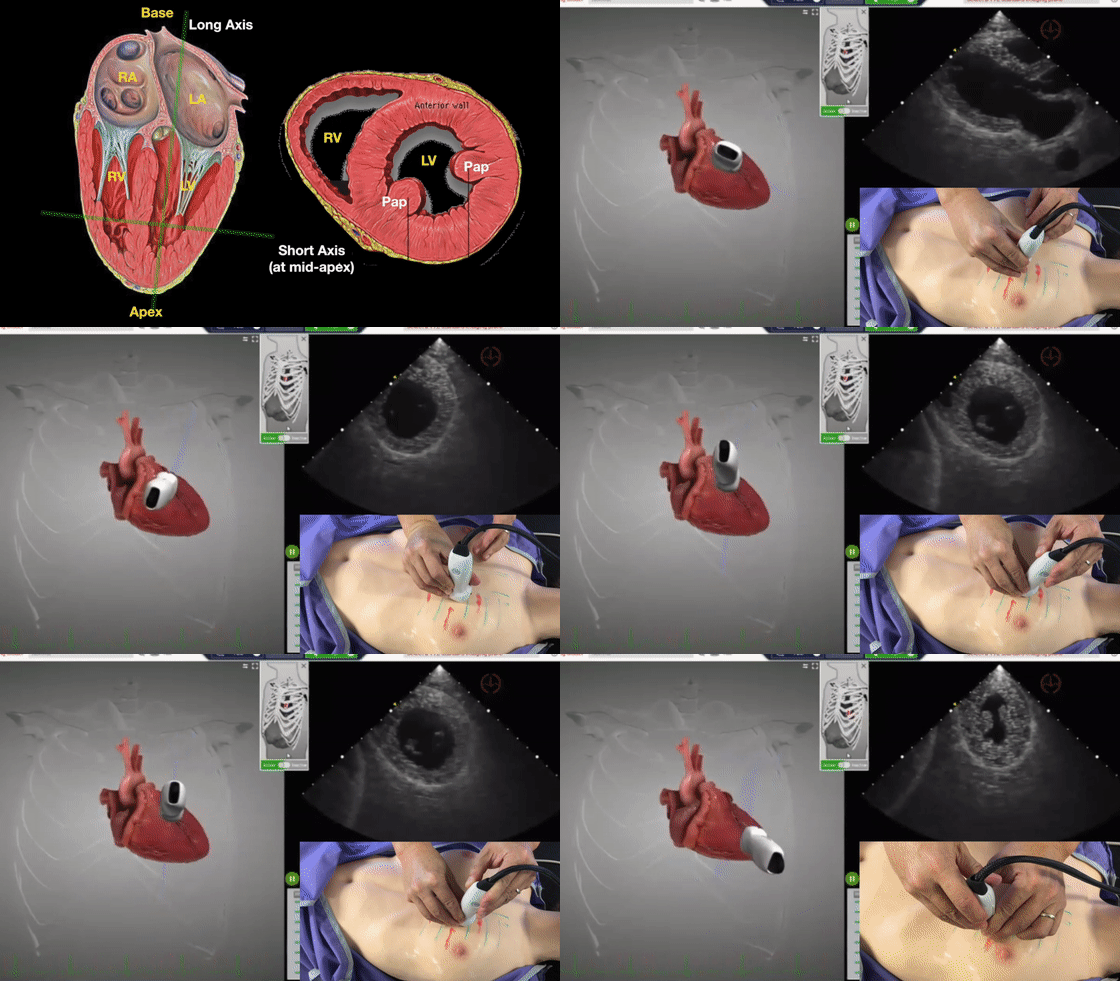
Figure 8. The parasternal short axis
Summary
Echocardiography is a POCUS skill that requires the sonographer to understand the cross-sectional cardiac anatomy, and to be able to predict changes based on deliberate probe movements. Developing a technique to acquire basic parasternal windows, using isolated probe movements, will help you to master echo troubleshooting, and apply when your echo skills will matter most--on your next sick patient!
References
- Alan Chiem. Focused echo training. YouTube video, published on 11/16/20. Accessed on 12/23/20: https://youtu.be/1mhitYUiAbI
- Bahner DP, Blickendorf JM, Bockbrader M, et al. Language of Transducer Manipulation: Codifying Terms for Effective Teaching. J Ultrasound Med. 2016;35(1):183-8.
- Lang RM, Badano LP, Mor-Avi V, et al. Recommendations for cardiac chamber quantification by echocardiography in adults: an update from the American Society of Echocardiography and the European Association of Cardiovascular Imaging. Eur Heart J Cardiovasc Imaging. 2015;16(3):233-70.
Alan Chiem, MD, MPH, FACEP
Director, Ultrasound Department of Emergency Medicine, Olive View-UCLA Medical Center
Associate Professor of EM at David Geffen School of Medicine at UCLA

